International Journal of Nanomaterials, Nanotechnology and Nanomedicine
Modification of the Structure and Mechanical Properties of Cu-30%Zn alloy with Cerium and Silicon
Iyebeye KO, Nwambu CN* and Nnuka EE
Cite this as
Iyebeye KO, Nwambu CN, Nnuka EE. Modification of the Structure and Mechanical Properties of Cu-30%Zn alloy with Cerium and Silicon. Int J Nanomater Nanotechnol Nanomed. 2024;10(2):045-051. Available from: 10.17352/2455-3492.000061Copyright License
© 2024 Iyebeye KO, et al. This is an open-access article distributed under the terms of the Creative Commons Attribution License, which permits unrestricted use, distribution, and reproduction in any medium, provided the original author and source are credited.This study investigates how the introduction of cerium and silicon influences the structure and mechanical characteristics of Cu-30%Zn alloy. The examined properties included tensile strength, hardness, and impact resistance. The tensile strength of the developed alloys was determined using an automated JPL tensile strength tester (Model: 130812) with a capacity of 100 kilonewtons, following the ASTM D638 standard. The impact strength was assessed by the ASTM D256 standard using a pendulum impact testing machine (Model: U1820). Additionally, hardness testing was conducted using a Brinell tester. The Brinell hardness test was performed with a portable dynamic hardness tester (Model: DHT-6) by the British Standard (BS EN ISO 6505-1:2014). Specimens were prepared by incorporating cerium and silicon into the Cu-30%Zn alloy at concentrations of 0.1wt%, 0.3wt%, 0.5wt%, 1.0wt%, 3.0wt% 5.0wt% ranging from 0.1% to 5.0%, with increments of 0.2% for micro addition and 2.0% for macro addition. Microstructural analysis was performed using an L2003A reflected light metallurgical microscope. Scanning Electron Microscopy (SEM) and energy-dispersive X-ray spectroscopy (EDX) were also utilized to characterize the cast specimens. The findings revealed a proportional increase in tensile strength, impact strength, and hardness strength with the rise in dopant concentrations up to 3.0wt% for cerium and silicon. Also, the analysis uncovered the presence of. primary α-phase, β-phase (intermetallic phases), and fine stable phase. These phase modifications contributed to the enhancement of mechanical properties. Cu-30wt%Zn enriched with 3.0% cerium and silicon demonstrated heightened tensile strength, impact strength, and hardness, making it a recommended choice for engineering applications.
Background
Copper stands out among non-ferrous metals due to its superior electrical and thermal conductivity, excellent corrosion resistance, good ductility and malleability, and adequate tensile strength. The constant demand from the electrical industry for the world's dwindling copper resources has prompted the search for more affordable materials to substitute the increasingly costly copper alloys [1,2]. While metallurgists have been enhancing the ductility of mild steel, engineers have been devising more efficient metal-forming techniques. As a result, copper alloys are now reserved for applications where high electrical conductivity or a combination of good formability and corrosion resistance is essential [3,4]. Copper-based alloys encompass bronzes and brasses, with the latter being copper-rich alloys that include tin, aluminum, silicon, beryllium, cerium, etc. Cu-30%Zn alloy, a type of brass where zinc is the primary alloying element added to copper, is valuable in numerous engineering structures, with various alloys finding applications across different industries [5,6]. According to the ISO 428 specification, most types of brass consist of 5% - 30% by weight of zinc, along with other alloying elements like tin, nickel, manganese, and silicon in varying amounts [7]. The higher strength of brass compared to other copper alloys makes it particularly suitable for manufacturing Plumbing and Pipe Fittings, Electrical Components, Musical Instruments, Marine Hardware, Decorative Items and Jewelry, and Automotive Industry [8,9]. Brass offers a unique blend of chemical and mechanical properties that surpasses many other alloy series, making it especially favored for critical applications. Despite these advantageous traits, most brass performs poorly in certain critical applications, such as subsea weapons ejection systems, aircraft landing gear components, and power plant facilities. It is crucial to address these clear performance limitations in brass to align with the demands of modern technologies [10]. Modifying the structure of brass involves employing one or a combination of these processes: heat treatment, alloying, and deformation. Typically, the method chosen is determined by its cost-effectiveness. The mechanical properties of brass are influenced by how extensively zinc and other alloying elements alter the structure [11,12]. There are two main methods of alloying, namely, macro and micro alloying. Macro alloying involves the addition of alloying elements in large quantities to a metal or alloy, resulting in significant changes to its composition and properties. In contrast, microalloying utilizes small amounts of elements for a specific effect [13-16]. Macro alloying can greatly impact the metal’s mechanical, physical, and chemical properties, addressing specific requirements and enhancing performance in targeted applications. The effects of macro alloying can include improved strength, increased hardness, enhanced corrosion resistance, better heat resistance, or other desired property modifications [17-21]. The selection of macro alloying elements depends on factors such as the base metal, desired properties of the final alloy, and intended application. Examples of common macro alloying elements include chromium (Cr), nickel (Ni), molybdenum (Mo), manganese (Mn), and tungsten (W), each contributing unique characteristics such as increased strength, improved wear resistance, or enhanced heat resistance [22-24].
Macro alloying is critical in developing advanced materials for the aerospace, automotive, construction, and energy industries. Manufacturers can customize alloys by strategically incorporating macro alloying elements to meet specific performance requirements, producing stronger, more durable, and more efficient materials [24-26]. It is worth noting that the concentration of macro alloying elements is significantly higher compared to microalloying. Therefore, carefully considering the alloy’s composition and the potential effects of macro alloying is essential to ensure the desired properties are achieved while maintaining overall material integrity and performance Ozgowicz, et al. [27]. Microalloying refers to adding small amounts of specific alloying elements to a metal or alloy to achieve desired improvements in its properties. Unlike macro alloying, which involves adding elements in larger quantities, microalloying focuses on precise additions of elements to achieve targeted effects at the microstructural level [14].
The added micro-alloying elements interact with the base metal or alloy on a microscopic scale, influencing the material’s mechanical, physical, and chemical properties. These elements are chosen based on their ability to form stable compounds or phases within the microstructure, leading to enhanced strength, toughness, corrosion resistance, or other desired characteristics [11,12,28].
The research will help to reduce the factors that lead to failure in engineering designs and construction by creating reliable alloys with better mechanical properties than traditional ferrous materials like stainless steel. To achieve this, carbide-forming elements and rare earth metals will be added to the alloys, which will refine and alter the intermetallic compounds in them, stabilize the beta phase, and prevent the formation of the gamma phase that can negatively impact the properties of the alloys. This research aims to modify the structure of a Cu-30% Zn alloy by incorporating Cerium and Silicon, focusing on altering the types, forms, and distribution of phases within the matrix, and studying their impacts on the mechanical properties.
Materials and methods
The initial alloy used in the study was created from commercially pure copper (99.99%) and commercially pure zinc (99.98%). The doped Cu-30%Zn alloy was then manufactured by adding cerium and silicon in concentrations ranging from 0.1%, 0.3%, 0.5%, 1.0%, 3.0%, and 5.0% by weight using the permanent mold casting technique. A bail-out crucible furnace was utilized for the melting process. To produce the control alloy cast samples, pure copper in the form of copper wire was initially charged into the preheated furnace and melted. A specified amount of zinc in piglet form was then added to the molten copper and stirred thoroughly. The melt was held for approximately 15 minutes to ensure the complete dissolution of zinc into the copper melt and achieve homogeneity. Subsequently, the mixture was poured into preheated permanent molds and allowed to cool to ambient temperature. Following this, the Cu-30wt%Zn alloys containing the additives were produced by following the same procedure described above, with the addition of varying concentrations of cerium and silicon.
A tensile test was conducted on cast specimens using an automated 100 kN JPL tensile strength tester (Model: 130812) to determine the tensile strength and percentage elongation of the developed alloys following the ASTM D 638 standard for universal testing.
The Brinell hardness test was performed using a portable dynamic hardness testing machine (Model: DHT-6) according to the British standard (BS EN ISO 6505-1:2014). The specimen was positioned on an Equotip test block, and the machine was automatically operated until the indenter made contact with the specimen's surface. The hardness value was then read directly from the machine's scale and recorded as the test result.
Impact testing was conducted on the cast samples by the ASTM D256 standard, utilizing a pendulum impact testing machine (Model: U1820). Before conducting the structural analysis, the surfaces of the specimens underwent preparation steps as follows: they were ground using emery papers of varying grades, starting from rough (200 μm) to fine (1200 μm). Subsequently, the specimens were polished to achieve a mirror finish using aluminum oxide (Al2O3) powder, followed by rinsing with water and drying with a hand dryer.
Next, the dried samples were etched for 60 seconds using a solution composed of 10 g of iron (III) chloride, 30 cm3 of hydrochloric acid, and 120 cm3 of water.
Finally, the surface morphology of the etched samples was analyzed using an optical metallurgical microscope (Model: L2003A), Scanning Electron Microscopy (SEM), and Energy Dispersive Spectroscopy (EDS).
Results and discussion
Mechanical properties of Cu-30wt%Zn alloy
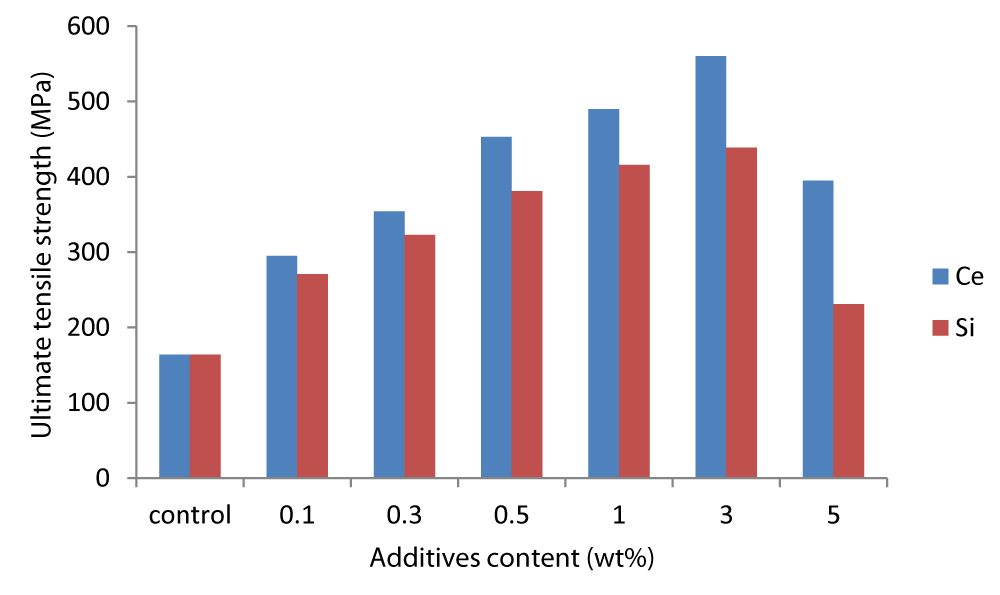
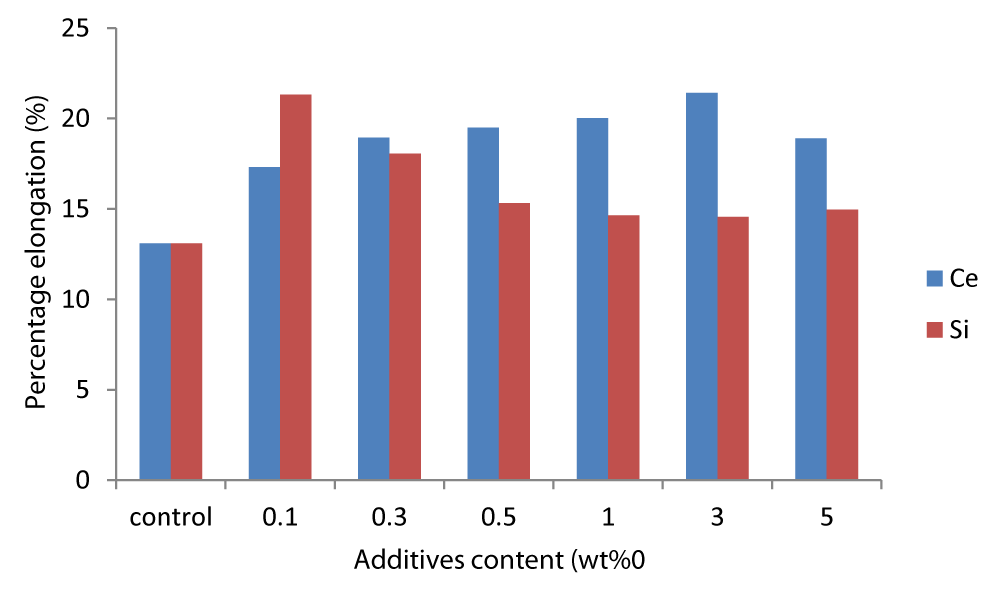
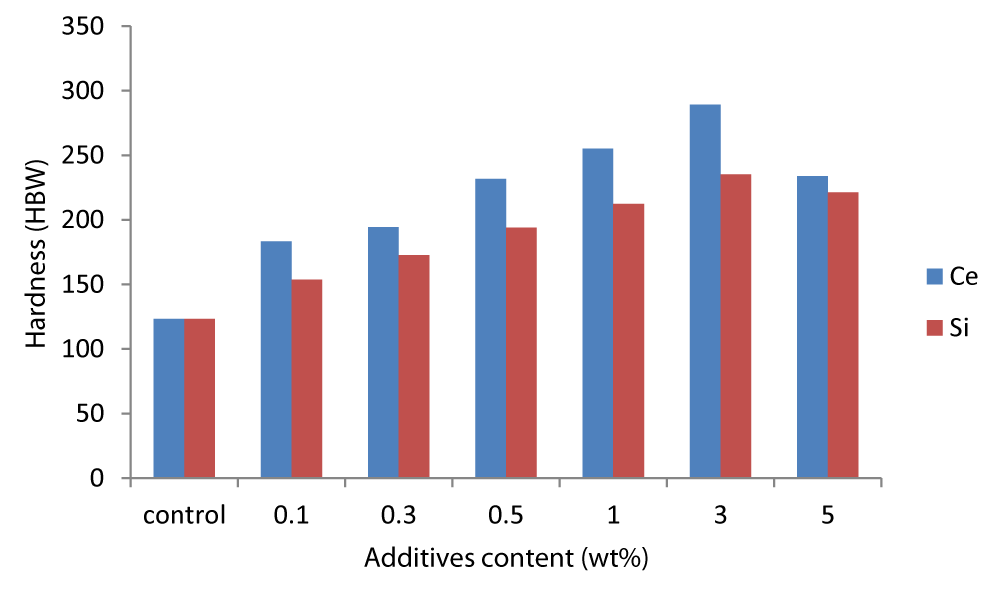
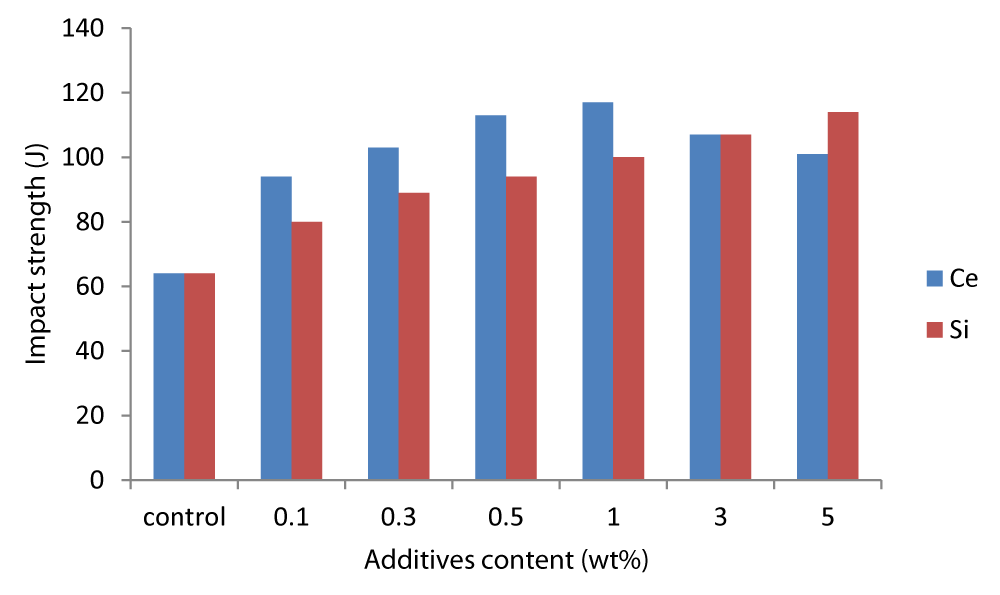
The results of the effect of cerium and silicon additions on the structure and mechanical properties of Cu-30%Zn alloy were presented in graphical form. Figures 1-4 show the variation of ultimate tensile strength, hardness strength and impact strength, and percentage elongation of the studied alloys. The study's results indicated that mechanical properties improved with increasing concentrations of cerium and silicon additives. However, alloys treated with cerium exhibited higher values compared to those treated with silicon. The maximum values obtained for ultimate tensile strength, % elongation, hardness, and impact strength after adding cerium and silicon to the Cu-30wt%Zn alloy resulted in significant improvements. The improvement in the mechanical properties of the alloys was attributed to the presence of refined and modified intermetallic phases in the structure of the alloys.
Optical, Scanning Electron Microscopy (SEM) and Electron Dispersive X-ray (EDX) analyses of the alloys
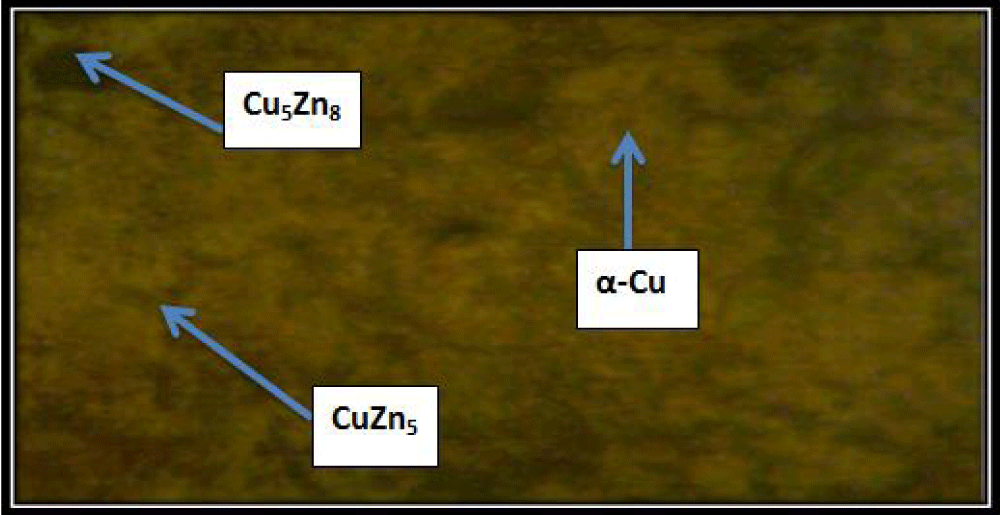
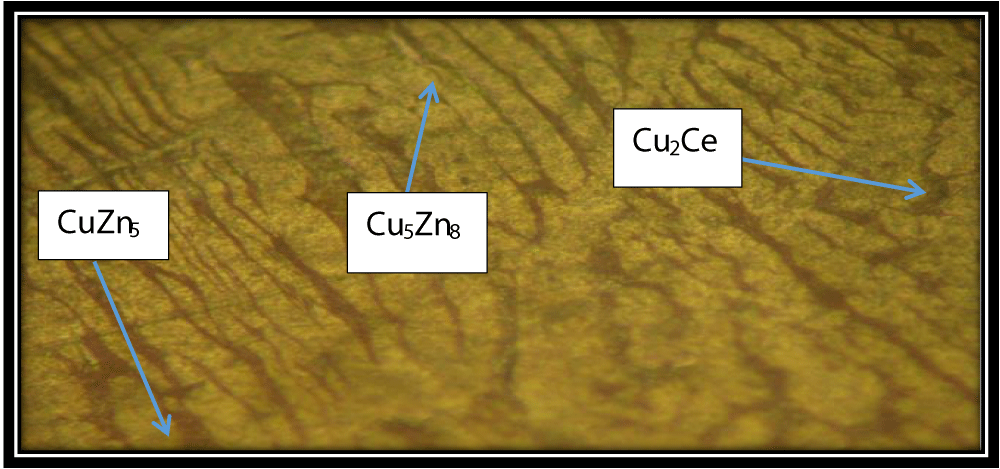
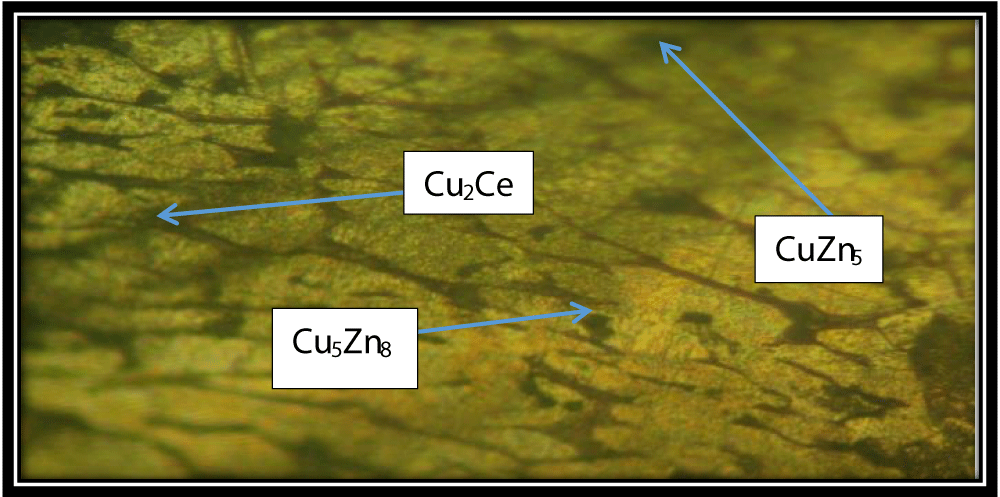
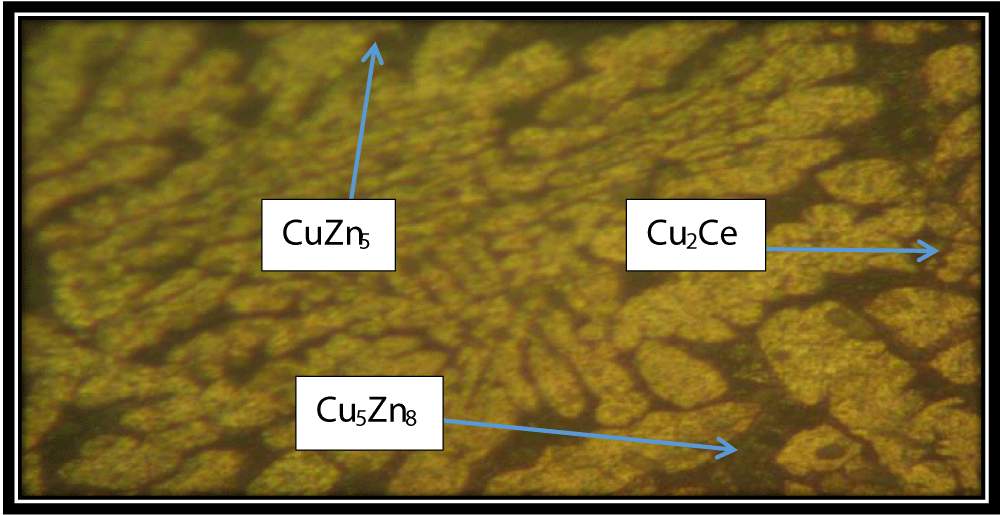
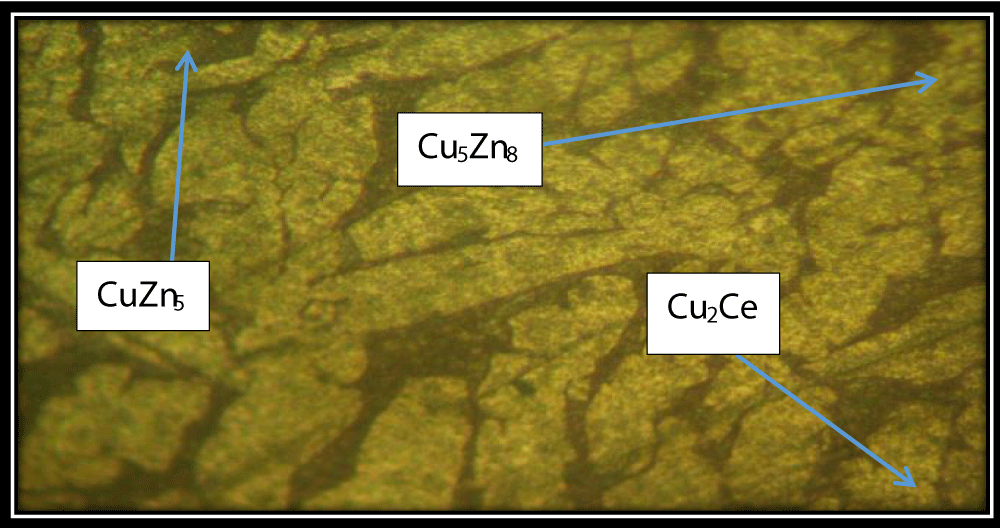
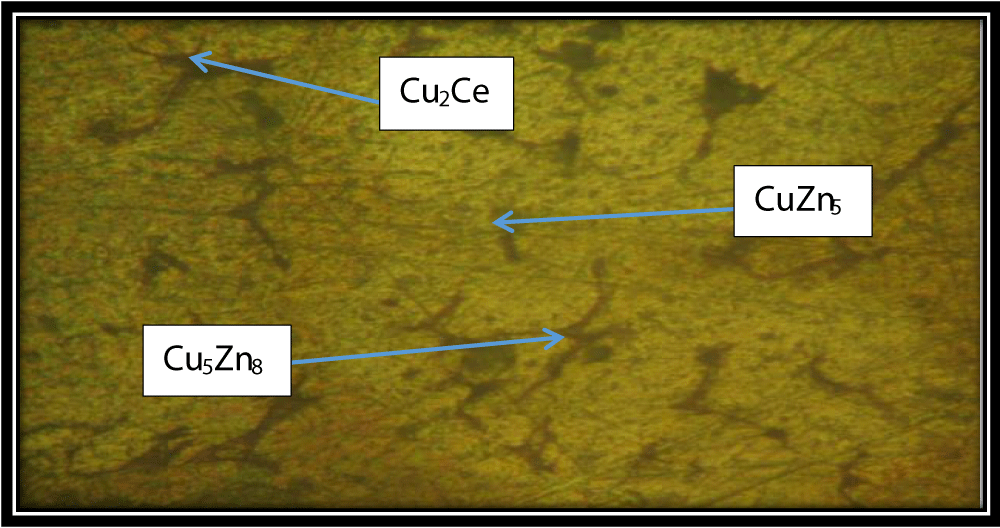
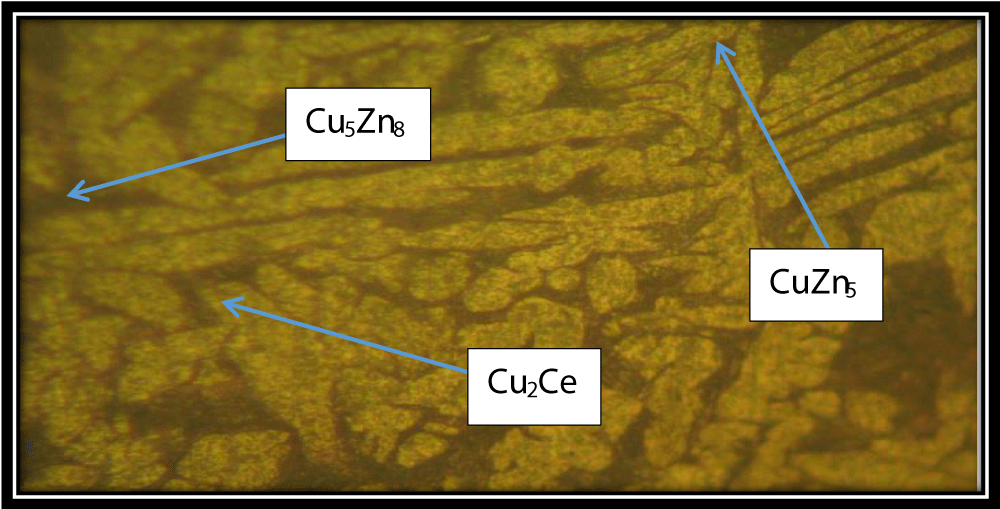
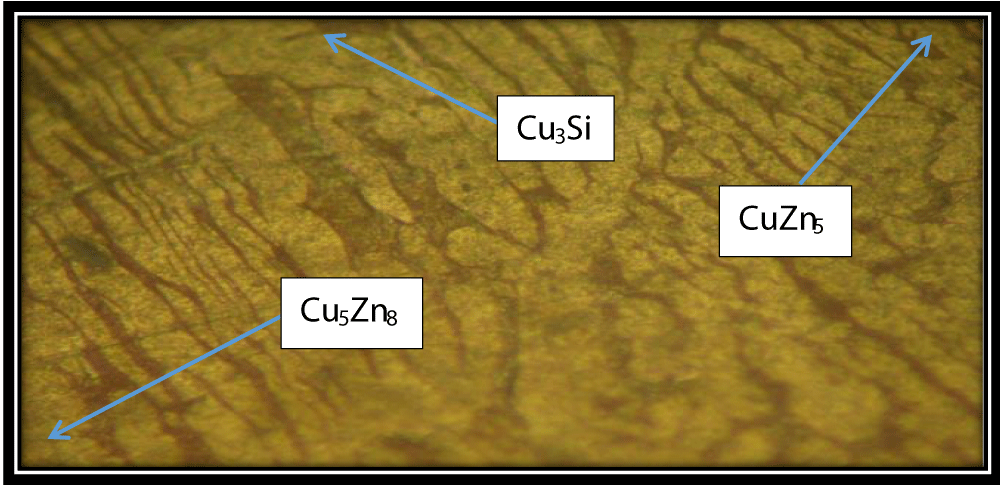
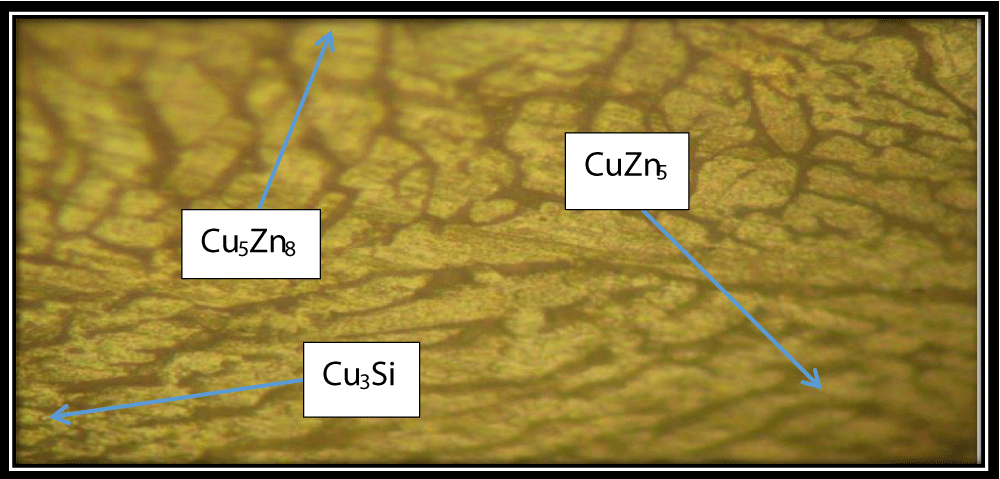
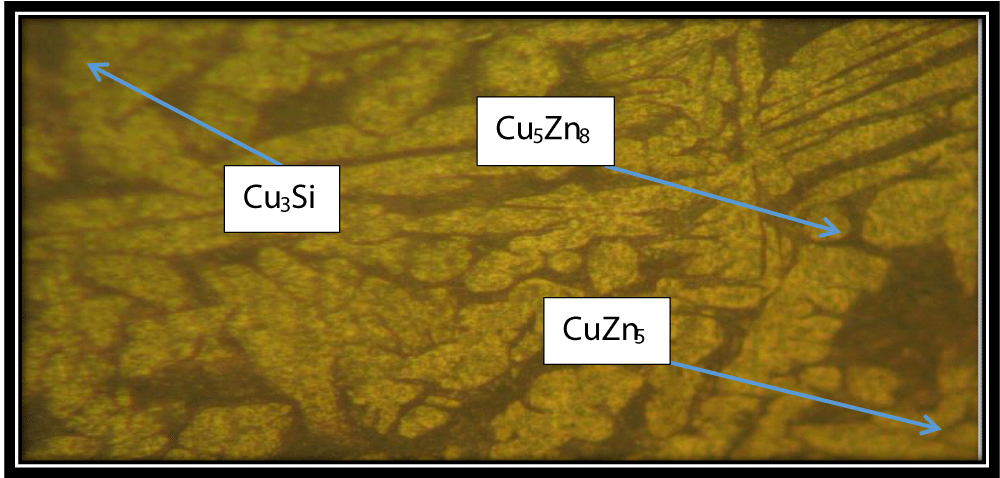
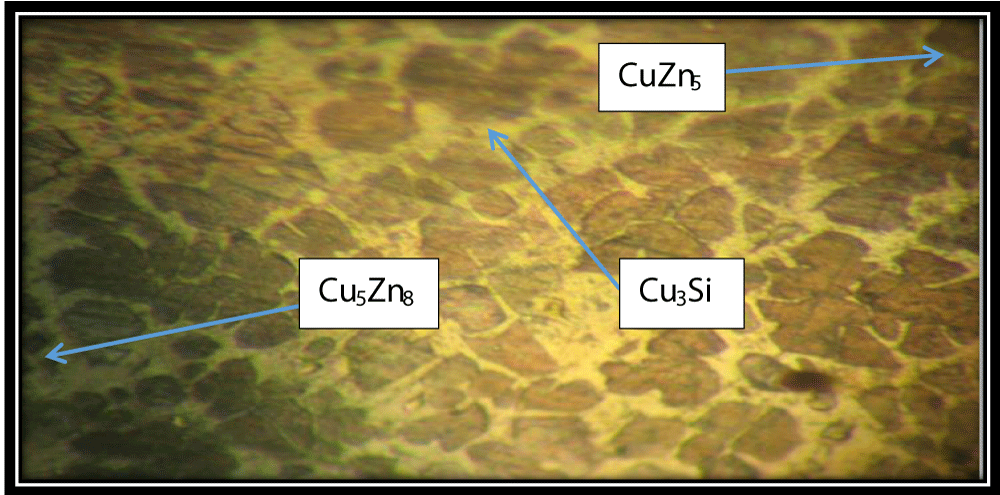
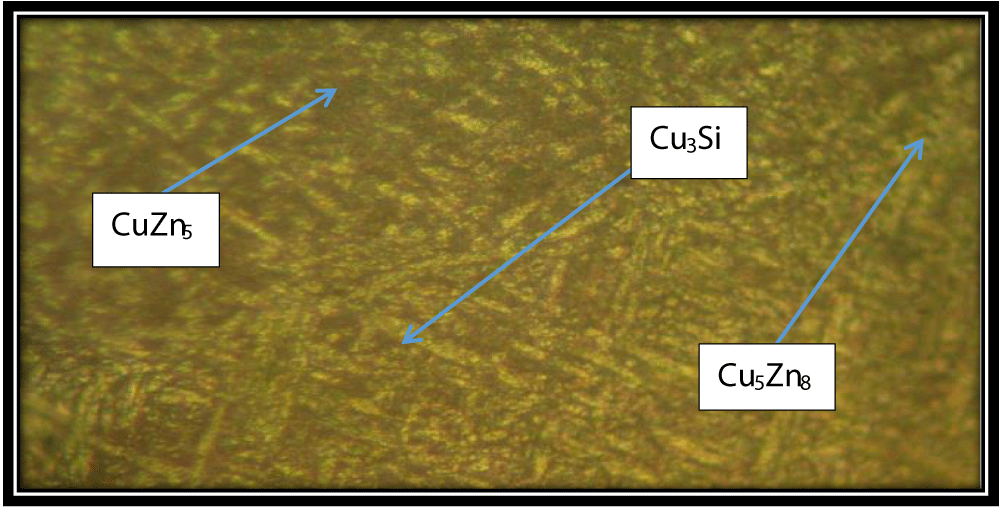
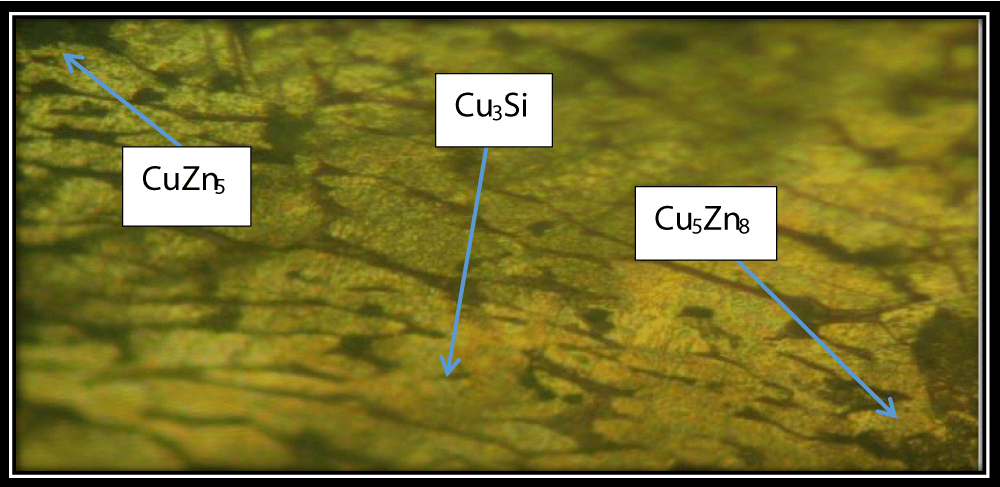
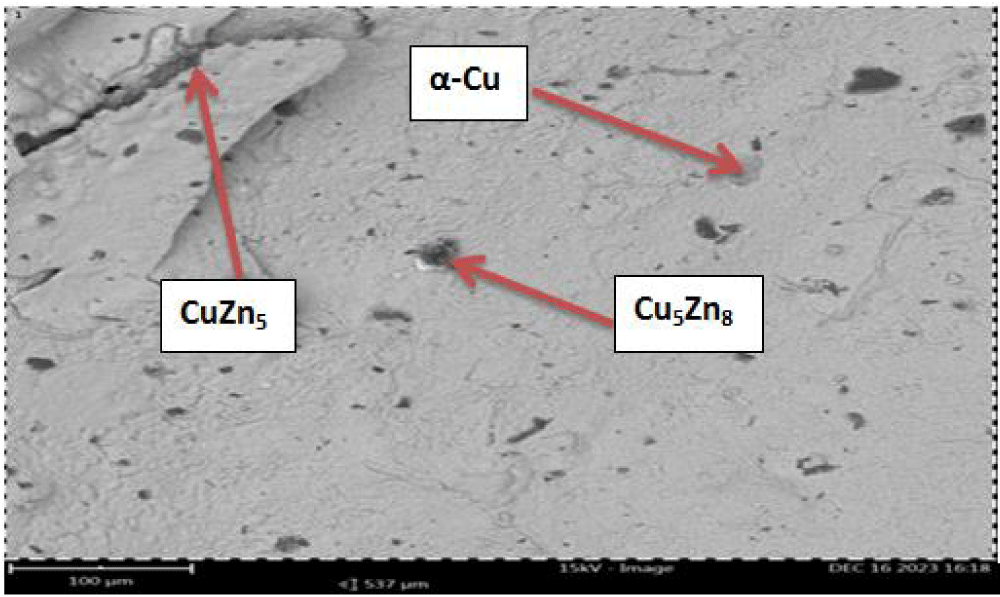
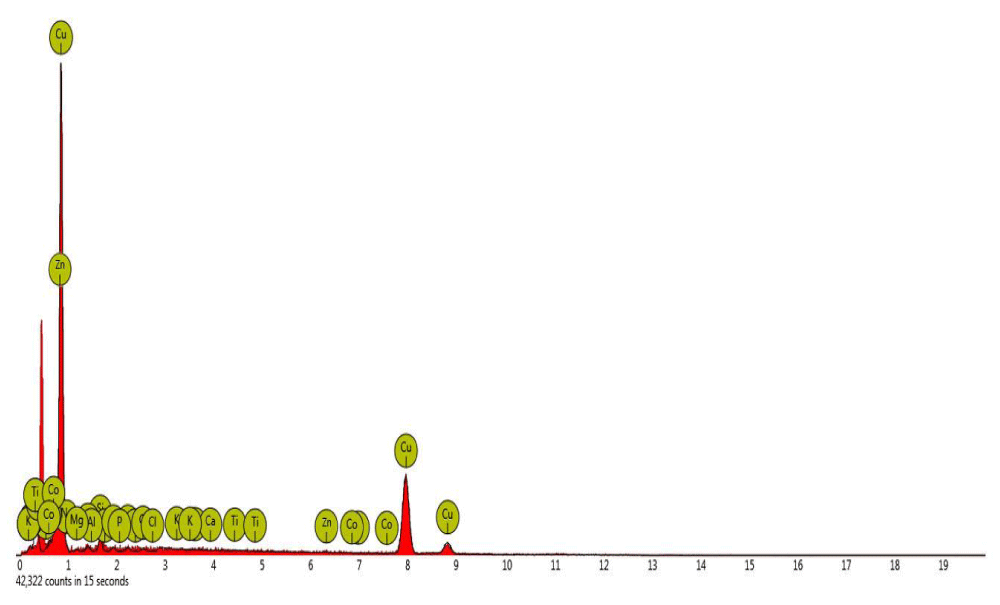
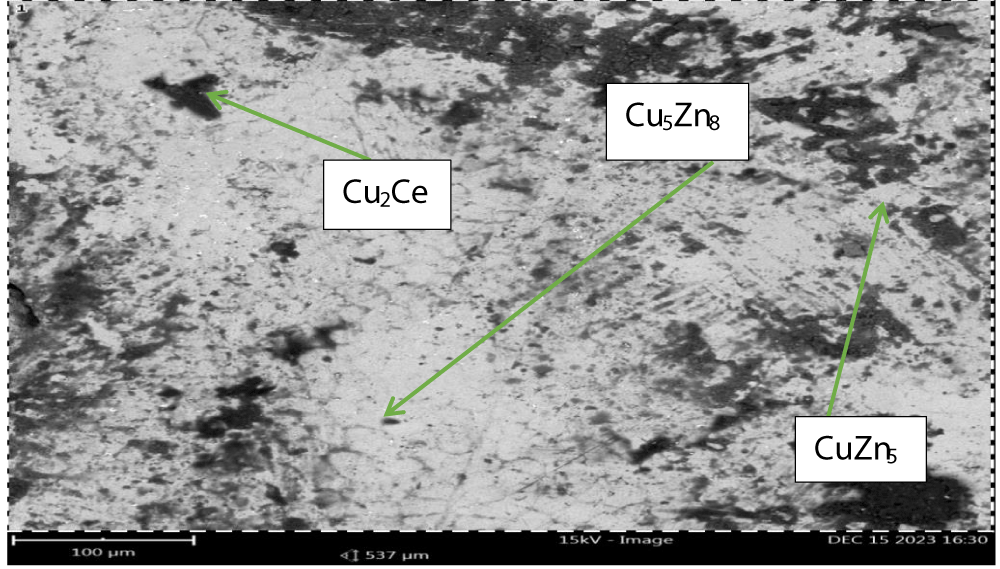
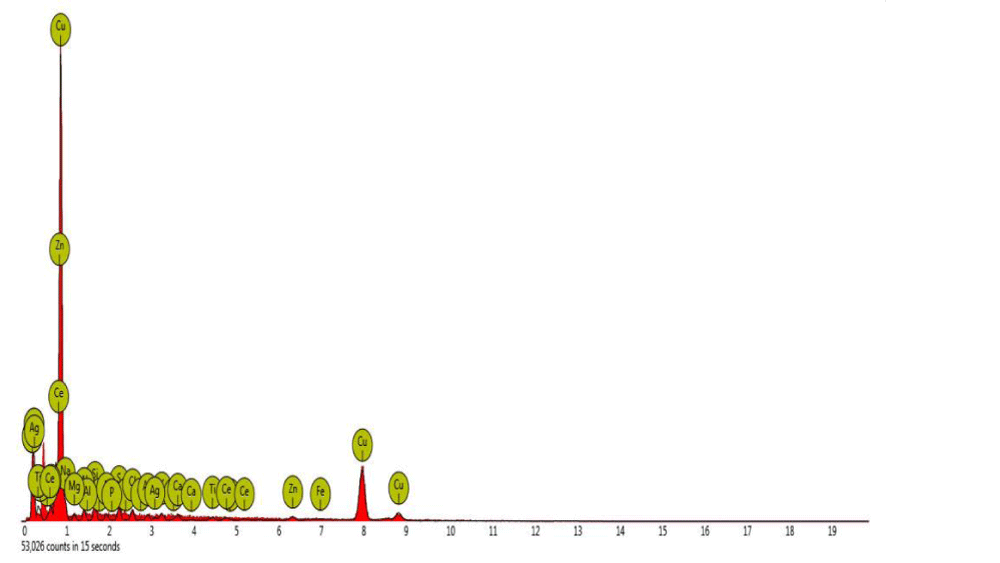
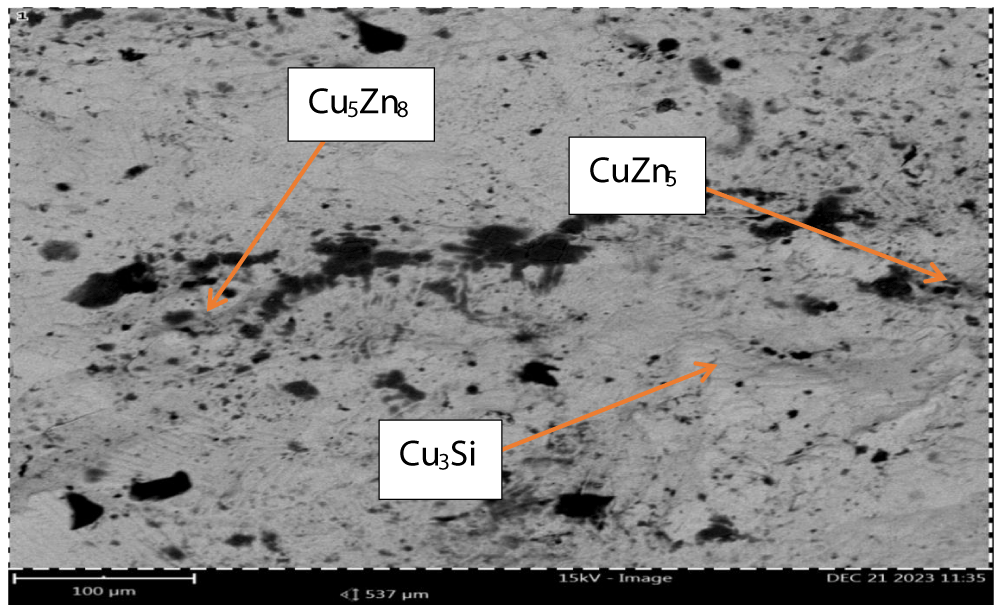
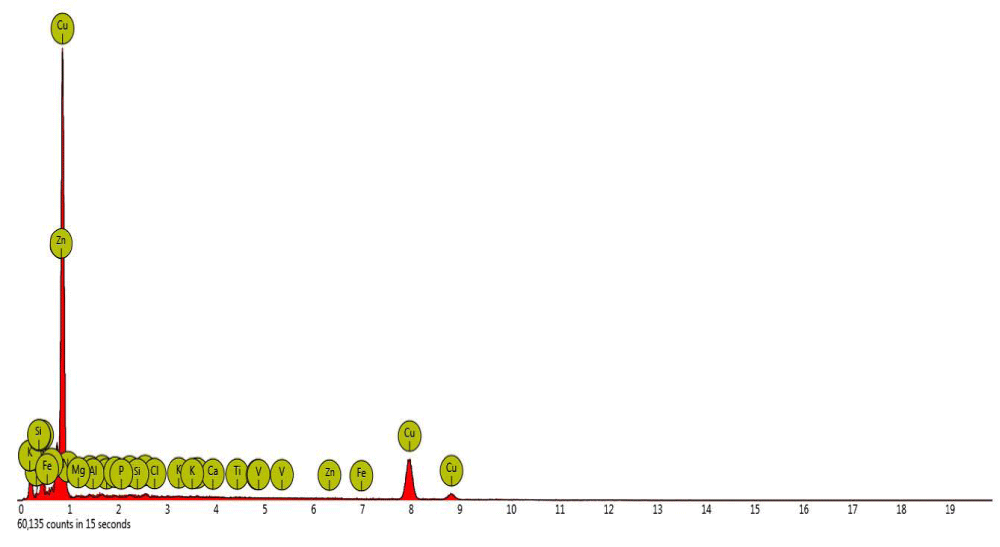
Plates 1-14 present the analyses of the alloys using optical microscopy, scanning electron microscopy, and X-ray diffraction. From plate 1 which is the control specimen, it was observed that the microstructure consists of large coarse interconnected intermetallic Cu5Zn8, CuZn5 compound, and α-copper phase. This alloy demonstrates the lowest mechanical properties, including tensile strength, impact strength, percentage elongation, and hardness, due to its coarse microstructure. Plates 2-11 show the microstructures of Cu-30% Zn alloy modified with 0.1, 0.3, 0.5 1.0, 3.0, 5.0 (wt %) of modifying elements (cerium and silicon) respectively. The plates 2-7 reveal the presence of CuZn5, Cu5Zn8, and Cu2Ce, and plates 8-13 reveal the presence of CuZn5, Cu5Zn8, and Cu3Si intermetallic phases in the structure of the alloys doped with cerium and silicon. Scanning electron microscopy (SEM) and electron dispersive X-ray (EDX) analyses of the alloy samples also indicate the presence of this intermetallic in the structure of the alloys, (Plates 14-19) respectively. The addition of cerium and silicon refines and modifies the morphology of the intermetallic compounds, leading to an increase in ultimate tensile strength, percentage elongation, hardness, and impact strength. The grain size decreases with the concentration of cerium and silicon up to 3.0 wt% (plates 6 and 12). Smaller grain sizes result in an increased number of grain boundaries, which impede dislocation motion and consequently enhance the ultimate tensile strength, hardness, percentage elongation, and impact strength of the alloys. But, plates 2-5 and 8-11 showed a coarse morphology. However, increasing the cerium concentration beyond 3.0 wt% coarsens the morphology of the intermetallic compounds, resulting in a decrease in ultimate tensile strength, percentage elongation, impact strength, and hardness (plates 7 and 13). The presence of Cu2Ce and Cu3Si compounds in the structure of the alloy further improved the strength and hardness of the alloy. Tables 1-3, showed the data in EDX spectrometry for the control sample (as-cast), doped with 3wt% cerium and silicon respectively.
Conclusion
The modification of the structure and mechanical properties of Cu-30%Zn alloy with Cerium and Silicon has been examined. The following conclusions can be drawn from the experimental results and theoretical analysis:
- Adding cerium and silicon to the Cu-30wt%Zn alloy successfully refined and modified the alloy's structure, resulting in improved physical and mechanical properties.
- When comparing the effects of cerium and silicon on Cu-30wt%Zn, cerium yielded better results than silicon.
- Undoped Cu-30wt%Zn alloy exhibits low physical and mechanical properties due to the presence of a coarse intermetallic phase at the grain boundaries.
- It was also established that macro alloying of the Cu-30wt%Zn alloy provided better properties than microalloying.
- The addition of cerium and silicon also led to the formation of Cu2Ce and Cu3Si respectively, which further contributed to the enhancement of the alloy's physical and mechanical properties.
- Basori B, Sofyan T. Influence of Manganese on the Recrystallization of cu zn alloy. Materials Science Forum. 2020; 867:166-171.
- Nwambu CN, Anyaeche IM, Onwubiko GC, Nnuka EE. Modification of the structure and mechanical properties of aluminum bronze (Cu-10% Al) alloy with zirconium and titanium. Int J Sci Eng Res. 2017;8(1):1048-1057. Available from: https://www.ijser.org/researchpaper/Modification-of-the-structure-and-mechanical-properties-of-aluminum-bronze-Cu-10-Al-alloy-with-Zirconium-and-Titanium.pdf
- Onyia CW, Nnuka EE, Nwambu CN. Influence of chromium on the structure and physic-mechanical properties of Cu-3wt% Si alloys. UNIZIK J Eng Appl Sci. 2024;3(1):400-408. Available from: https://journals.unizik.edu.ng/ujeas/article/view/2968
- Okelekwe MN, Nwambu CN, Nnuka EE. Correlation of the structure, mechanical, and physical properties of Cu-4wt%Mg-xwt%Co alloy. J Emerg Technol Innov Res. 2024;11(4):10. Available from: https://www.jetir.org/papers/JETIR2404273.pdf
- Tambunan AF, Angela I, Basori I, Sofyan BT. Effect of cold rolling and annealing temperature on the characteristics of Cu-28Zn-1.1Bi alloy produced by gravity casting. Mater Sci Forum. 2018;939:73-80. Available from: https://www.scientific.net/MSF.939.73
- Gadhu G, Sofyan BT, Basori I. Effects of deformation and annealing temperature on the microstructures and hardness of Cu-29Zn-0.6Bi brass. Key Eng Mater. 2017;748:218-223. Available from: https://www.scientific.net/kem.748.218
- Sujit K, Devibala B, Rajalingam P. Experimental analysis of microstructure and mechanical properties of copper and brass-based alloys. Int J Automot Mech Eng. 2015;11:2317-2331. Available from: https://www.semanticscholar.org/paper/EXPERIMENTAL-ANALYSIS-OF-MICROSTRUCTURE-AND-OF-AND-Jha-Balakumar/b1a98b31b2df286c834a4b86e3d1a41952644bc2
- Celdk H, Aldirmaz E, Daksoy D. Effects of deformation on the microstructure of Cu-Zn-Ni alloy. Gazi Univ J Sci. 2012;25(2):337-342. Available from: https://dergipark.org.tr/en/pub/gujs/issue/7423/97469
- Edward E, Oluwaseun A, Adefemi O, Ilesanmi A. Evaluation of mechanical and microstructural properties of α-brass alloy produced from scrap copper and zinc metal through sand casting process. J Miner Mater Charact Eng. 2017;5:18-28. Available from: https://www.scirp.org/journal/paperinformation?paperid=72852
- Jones G, Pearson J. Factors Affecting Grain Refinement of Brass Using Titanium and Boron Additives. International Journal of Scientific & Engineering Research. 2018; 9:2:223-234.
- Puathawee S, Rojananan S, Rojananan S. Effect of Silicon and Tin on the microstructure of Cu-Zn (brass) alloy. Advanced Materials Research. 2013; 802(1):169-173.
- Rajeshkumara L, Suriyanarayanan R, Hari K, Babu S, Bhuvaneswari V, Karuna M. Influence of boron carbide addition on particle size of copper-zinc alloys synthesized by powder metallurgy. Mater Sci Eng J. 2020;954:1-9. Available from: https://iopscience.iop.org/article/10.1088/1757-899X/954/1/012008/meta
- Imai H, Shufeng L, Katsuyoshi, Takuya O. Microstructure and mechanical properties of Cu-40%Zn¬0.5%Cr alloy by powder metallurgy. Jpn Soc Powder Powder Metallurgy. 2014;55(3):528-533. Available from: https://www.jstage.jst.go.jp/article/matertrans/55/3/55_Y-M2013847/_article/-char/ja/
- Jha SK, Balakumar D, Paluchamy R. Experimental analysis of microstructure and mechanical properties of copper and brass-based alloys. Int J Automot Mech Eng. 2015;11:2317-2331. Available from: http://dx.doi.org/10.15282/ijame.11.2015.14.0195
- Jones G, Pearson J. Factors affecting grain refinement of brass using titanium and boron additives. Int J Sci Eng Res. 2018;9(2):223-234.
- Kakani SL, Kakani A. Material science. 1st ed. New Age International (p) Ltd.; 2004. pp. 381-383. Available from: https://www.scirp.org/reference/ReferencesPapers?ReferenceID=484678
- Kalinowska E, Ozgowicz W, Grzegorczyk B. The microstructure and mechanical properties of the alloy Cu-30% Zn after recrystallization annealing. J Achiev Mater Manuf Eng. 2010;40:1-10. Available from: https://www.researchgate.net/profile/Barbara-Grzegorczyk/publication/44567538_The_microstructure_and_mechanical_properties_of_the_alloy_CuZn30_after_recrystallizion_annealing/links/0912f50747fe1d85d3000000/The-microstructure-and-mechanical-properties-of-the-alloy-CuZn30-after-recrystallizion-annealing.pdf
- Kenneth A, Ayoola S, Peter O. Mechanical and corrosion behavior of iron-modified Cu-Zn-Al alloys. Acta Metall Slovaca. 2013;19(4):292-301. Available from: https://journals.scicell.org/index.php/AMS/article/view/61
- Kommela L, Hussainovaa I, Volobueva O. Microstructure and properties development of copper during severe plastic deformation. Mater Des. 2007;28(7):2121-2128. Available from: https://www.sciencedirect.com/science/article/abs/pii/S0261306906001713
- Nowosielski R, Sakiewicz P. Ductility minimum temperature phenomenon in as cast CuNi25 alloy. J Achiev Mater Manuf Eng. 2006;17:193-196.
- Maret A, Wolfgang P. Chapter 12. Zinc and Human Disease. In: Interrelations between Essential Metal Ions and Human Diseases. Metal Ions in Life Sciences. 2013;13:389-414. Available from: https://link.springer.com/chapter/10.1007/978-94-007-7500-8_12
- Mrowka NG. Influence of chemical composition variation and heat treatment on microstructure and mechanical properties of 6xxx alloys. Arch Mater Sci Eng. 2010;46:98-107.
- Okayasu M, Muranaga T, Endo A. Analysis of microstructural effects on mechanical properties of copper alloys. J Sci Adv Mater Devices. 2017;2:128-139. Available from: https://www.sciencedirect.com/science/article/pii/S2468217916301915
- Ovat FA, Asuquo LO, Abam FI. The influence of aluminum and manganese on some mechanical properties of brass. Res J Eng Appl Sci. 2012;1(4):214-218. Available from: https://citeseerx.ist.psu.edu/document?doi=10.1.1.368.3179&rep=rep1&type=pdf
- Ozgur U, Ya I, Alivov C, Liu A, Teke M, Reshchikov S, Doğan V. A comprehensive review of ZnO materials and devices. J Appl Phys. 2015;98:041301. Available from: https://aip.scitation.org/doi/abs/10.1063/1.1992666
- Ozgowicz W, Kalinowska EO, Grzegorczyk B. The Microstructure and Mechanical Properties of the Alloy Cu-30% Zn after Recrystallization Annealing. J Achiev Mater Manuf Eng. 2010;40:1-10. Available from: https://www.researchgate.net/publication/44567538_The_microstructure_and_mechanical_properties_of_the_alloy_CuZn30_after_recrystallizion_annealing
- Rajab H, Osama I. Influence of Al and Ti additions on microstructure and mechanical properties of leaded brass alloys. Indian J Mater Sci. 2014;2(4):1-5. Available from: https://onlinelibrary.wiley.com/doi/full/10.1155/2014/909506
- Rajeshkumara L, Suriyanarayanan R, Hari K, Babu S, Bhuvaneswari V, Karuna M. Influence of boron carbide addition on particle size of copper-zinc alloys synthesized by powder metallurgy. Mater Sci Eng J. 2020;954:1-9. Available from: https://iopscience.iop.org/article/10.1088/1757-899X/954/1/012008/meta
- Wen H, Topping D, Isheim D, Seidman D, Lavernia E. Strengthening mechanisms in a high-strength bulk nanostructured Cu-Zn-Al alloy processed via cryomilling and spark plasma sintering. Acta Mater. 2013;61:2769-2782. Available from: https://www.sciencedirect.com/science/article/abs/pii/S1359645412006593

Article Alerts
Subscribe to our articles alerts and stay tuned.
 This work is licensed under a Creative Commons Attribution 4.0 International License.

 Save to Mendeley
